I've yet to memorize Mattress Stitch.
Like grafting (kitchener stitch), it's just something that hasn't yet become automatic.
However, since I have to seam my Marian Cowl (the pattern is written in-the-round, but I don't have any 12.75 mm circulars, just straights), I wanted something that would be close to invisible but not too heavy.
So, hence my searching for a tutorial on Mattress Stitch.
And, once again, Knitty came to my rescue. They have a wonderful tutorial on Mattress Stitch that I currently have open while I seam.
. . . I love the internet. Just having this information at my fingertips with a simple web search is -amazing!-
However, I should return to seaming. I'll try and get pictures of the finished cowl once I get daylight tomorrow.
Showing posts with label tutorial. Show all posts
Showing posts with label tutorial. Show all posts
Monday, 23 December 2013
Saturday, 28 September 2013
Tubular Cast-Off Tutorial
Hello all!
When it comes to casting off, I usually have the problem of my cast-off being -way- too tight for my project. This is ok, or at least tolerable, on a sleeve, or something that will be seamed.
It -sucks- for any edge that needs the elasticity. The only reason my Freestyle Shawl (an older project) didn't suffer from this is because it was knit on a bigger needle size, and even then, the cast off edge is far tighter then I would like.
So, since the Fall Lake Slippers are knit toe-up, and I was really worrying about that cuff. Would my cast-off make the cuff just too darn tight?
But then I learned about a technique called Tubular Cast-Off. It's a touch more time-consuming, but it's worth it if you don't want a tight bind-off edge. The pattern actually contains a really nice tutorial on this.
From my internet research, there seem to be several ways of doing this, but I'm going to show you the one I like -- and the one that the pattern specifies.
(P. S.: I'm still perfecting taking camera pictures of my work in a way that doesn't come out blurry. I'd like to think I'm getting better, but I do know they're still not the greatest pictures.)
Start by doing at least one row of k1 p1 ribbing before your bind off row.
Then, measure across your work (or around if you're working in the round), and cut a tail of yarn four times longer then your measurement. Thread that through a tapestry needle.
 In this photo, I've already done part of the cast off, but that's ok, there's no set-up required for this, other then the previous row of ribbing.
Step one is to pass the tapestry needle through the first stitch on your needle as if to knit, slip the first stitch off of the needle.

Next, keeping the yarn in front, pass the tapestry needle through the first stitch on the needle as if to purl and slip this stitch off of the needle.

Now, bring the yarn behind (not over the needle, you don't want a yarn-over here), and insert the tapestry needle between the first and second stitches on the needle, going from back to front.

The last step is to pass the needle, once again, through the second stitch on the needle as if to knit.

And that is that! Repeat this until all the stitches have been cast off, pull the tail through the last stitch, if necessary, and weave in the end.
As a note, this is actually a variant on grafting (aka kitchener stitch), so you'll see a lot of online tutorials asking you to split your work onto two needles. I like this method because you don't have to do that, but if you find that works better for you, then by all means.
This is a slower method then the typical cable cast-off, and it does mean that if you don't cut a long enough tail of yarn you could be in trouble. Also, because it does use the k1 p1 ribbing, it might not work for something like a shawl edge. But for things like cuffs (I'm betting this will see a lot of use when I try out toe-up socks!), it's actually really nice.
When it comes to casting off, I usually have the problem of my cast-off being -way- too tight for my project. This is ok, or at least tolerable, on a sleeve, or something that will be seamed.
It -sucks- for any edge that needs the elasticity. The only reason my Freestyle Shawl (an older project) didn't suffer from this is because it was knit on a bigger needle size, and even then, the cast off edge is far tighter then I would like.
So, since the Fall Lake Slippers are knit toe-up, and I was really worrying about that cuff. Would my cast-off make the cuff just too darn tight?
But then I learned about a technique called Tubular Cast-Off. It's a touch more time-consuming, but it's worth it if you don't want a tight bind-off edge. The pattern actually contains a really nice tutorial on this.
From my internet research, there seem to be several ways of doing this, but I'm going to show you the one I like -- and the one that the pattern specifies.
(P. S.: I'm still perfecting taking camera pictures of my work in a way that doesn't come out blurry. I'd like to think I'm getting better, but I do know they're still not the greatest pictures.)
Start by doing at least one row of k1 p1 ribbing before your bind off row.
Then, measure across your work (or around if you're working in the round), and cut a tail of yarn four times longer then your measurement. Thread that through a tapestry needle.

Step one is to pass the tapestry needle through the first stitch on your needle as if to knit, slip the first stitch off of the needle.

Now, pass the tapestry needle through the second stitch on your needle as if to purl. Leave this stitch on the needle.

Next, keeping the yarn in front, pass the tapestry needle through the first stitch on the needle as if to purl and slip this stitch off of the needle.

Now, bring the yarn behind (not over the needle, you don't want a yarn-over here), and insert the tapestry needle between the first and second stitches on the needle, going from back to front.

The last step is to pass the needle, once again, through the second stitch on the needle as if to knit.

And that is that! Repeat this until all the stitches have been cast off, pull the tail through the last stitch, if necessary, and weave in the end.
As a note, this is actually a variant on grafting (aka kitchener stitch), so you'll see a lot of online tutorials asking you to split your work onto two needles. I like this method because you don't have to do that, but if you find that works better for you, then by all means.
This is a slower method then the typical cable cast-off, and it does mean that if you don't cut a long enough tail of yarn you could be in trouble. Also, because it does use the k1 p1 ribbing, it might not work for something like a shawl edge. But for things like cuffs (I'm betting this will see a lot of use when I try out toe-up socks!), it's actually really nice.
Friday, 26 July 2013
Blocking Tutorial -- how to block an acrylic (or partially acrylic) project:
Hello!
So.
I have to block my Test-Knit socks.
And I promised a tutorial on how to block acrylic a few posts ago.
So, here we go.
You'll need four things.
1) Two towels.They should be ones you won't worry about too much if they get a bit of dye bleeding out. It shouldn't happen, but it can; and the last thing you want is your nice towels with a stain on them.

2) An Iron that has a steam setting. If you don't have a steam setting, there is a work-around.

3) The object you want to block, in this case, my sock,

 If it's a bigger project, you might have to immerse it in water. Try not to rustle it around too much, you don't want to accidentally felt any natural fibers, or cause any ends to come out.
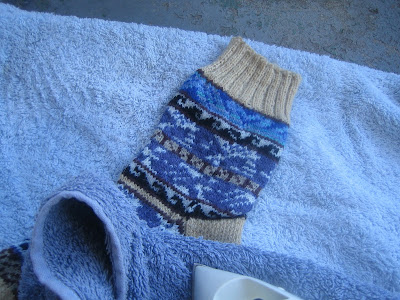
Put it on a towel to transfer it to a flat surface. Here, I've got it outside on our balcony. Then, cover it with a single layer of the other towel. (The single layer part's important.)

Now, iron the object with the towel over top of it. Use the steam setting.
 Be cautious, though. Since this sock is partially acrylic fibers, we don't want too much heat. Blocking acrylic is permanent, as you're actually melting the fiber just a bit (acrylic is basically plastic, after all!). If you over-block acrylic, you 'kill' it, which takes away all elasticity and gives it quite a bit of drape. "Killed" acrylic can be useful for some things, but a sock isn't one of them. And because this is a mixed fiber project, killing the acrylic would be a bad thing, since the wool wouldn't change nearly as much. I'd have hideous tension problems. So, block anything with acrylic in small increments. It's better to do too little and have to do more, then do too much. You can't undo blocking acrylic, unlike blocking natural fibers.
You want a single layer of towel between the iron and the object. This allows heat and steam transfer without scorching the acrylic (you'll scorch and melt the acrylic if you put the iron on it directly, this is a no-no!)
If you want to be cautious, you can do a double-layer of towel and take more time.
If you don't have a steam iron, boil some hot water and keep a small bowl of it nearby. Pour it onto the towel in small amounts, making sure it soaks through both the towel and the finished object.
Here, we're blocking up near the cuff. Since again, "killing" acrylic is irreversible, I've pulled the towel down so I can see and don't accidentally "kill" the cuff, because the cuff is acrylic, and the one spot in the sock where I really need the elasticity.

Once you do one side of the object, flip it over (if necessary) and repeat on the other side.


So.
I have to block my Test-Knit socks.
And I promised a tutorial on how to block acrylic a few posts ago.
So, here we go.
You'll need four things.
1) Two towels.They should be ones you won't worry about too much if they get a bit of dye bleeding out. It shouldn't happen, but it can; and the last thing you want is your nice towels with a stain on them.

2) An Iron that has a steam setting. If you don't have a steam setting, there is a work-around.

3) The object you want to block, in this case, my sock,

4) And water. I figure that doesn't need a picture.
Take your object and get it really wet with cold (or at least room-temperature) water. For this sock, running it under a tap for a few minutes should suffice.

Put it on a towel to transfer it to a flat surface. Here, I've got it outside on our balcony. Then, cover it with a single layer of the other towel. (The single layer part's important.)

Now, iron the object with the towel over top of it. Use the steam setting.

You want a single layer of towel between the iron and the object. This allows heat and steam transfer without scorching the acrylic (you'll scorch and melt the acrylic if you put the iron on it directly, this is a no-no!)
If you want to be cautious, you can do a double-layer of towel and take more time.
If you don't have a steam iron, boil some hot water and keep a small bowl of it nearby. Pour it onto the towel in small amounts, making sure it soaks through both the towel and the finished object.
Here, we're blocking up near the cuff. Since again, "killing" acrylic is irreversible, I've pulled the towel down so I can see and don't accidentally "kill" the cuff, because the cuff is acrylic, and the one spot in the sock where I really need the elasticity.

Once you do one side of the object, flip it over (if necessary) and repeat on the other side.

And there you go, there's your finished object, all set to wear. Put it
on as soon as you can stand the heat, so it will dry into shape.

Finally, since no project is complete without kitty-assisted blocking (as demonstrated by this Ravelry thread, and to a lesser extent in this Ravelry thread) I had a fuzzy little helper, who also liked to get in the way!

Isn't she cute?
So, I hope this helps some people, and proves that acrylic (and mixed-fiber projects) can be blocked. If you're looking for more information on blocking, there's oodles of info and examples on this Ravelry thread (which is where I got a lot of my information from, too!)
Saturday, 20 July 2013
Knitting and Math -- an Example and a Really Helpful Resource
Ok, hello folks!
So, I'm just getting to the cuff of my Birthday Gloves, and, as to be expected, the pattern calls for an 18 stitch increase on the last row of ribbing.
. . . except that it doesn't. It notes that depending on what Fair-Isle chart you use (the pattern presents two different chart sets) you might need more or less stitches.
That sounds scary, I know, but I'm going to show you how to do stuff like this, and make it less scary.
So, onto the specifics of my example:
Pattern says cast on 42 stitches. 42 stitches + an 18 stitch increase = 60 stitches.
Not so hard so far, right?
For the Traditional Star variation, which is the one I'm doing, Chart A, which is the back of the hand, is 27 stitches across.
60-27=33
Good so far, right?
Charts B through D, which are for the palm, are all 4 stitch repeats.
This gets a bit more complicated, but bear with me.
33 isn’t divisible by four. If you punch that into the calculator, you get 8.25. Since you can't have .25 of a stitch, we need to make this something that's divisible by four. 32 divided by 4 is 8, and 36 divided by 4 is 9. (This is the most complicated part, I promise. )
Since I’d rather these be a touch too big then a touch too small, (and I know I knit really tight in Fair Isle), lets go to 36 stitches for the palm (that means 9 pattern repeats).
Now, 27 (the back of the hand), + 36 (the number of stitches I need for the palm) = 63.
There's my total stitch count for around the hand.
I will have to remember this, because I'm going to have 3 extra stitches for the hand that I'll have to work in somewhere when I split the glove to do the fingers. I can easily add 1 stitch to the last three fingers of the glove, but it is something I'm going to have to remember.
Now, to figure out the increase row:
We're going from 42 stitches to 63 stitches.
63-42 is 21. So it's a 21 stitch increase.
Now, here's where I cheat a little. I could do all the math to figure out balanced increases all the way around the cuff . . . or I could just use KnittingFiend's tools. She's put up a calculator that does things like increases, decreases, and other useful things.
Since we've already done enough math for one day, I'll go with option number two. Plugging the numbers into her increase calculator, gives me my increase row.
(k1 m1 k1) repeat 21 times.
I can do that, and it saved the rest of my brainpower, and took a lot less time, too!
Hope this helps, and that calculator has saved me a lot of trouble, so I'm glad to be passing it on.
Friday, 19 July 2013
How to YO between a purl and a knit stitch
Hello again!
Well, this post is prompted by a few things.
1) I was working on my Alpaca Lace Legwarmers, which has a lot of YO's between purl and knit (and knit and purl) stitches, and I've always found that I actually have to think just a touch, or I'll screw the YO up and/or not make them consistent.
2) I was talking to a woman at Knit Night three weeks ago, and she was working on an eyelet pattern in seed stitch, and the YO between knit and purl (and vice-versa) was giving her grief. I was actually working on my Legwarmers at the time, so I had the ability to show her what I was doing and how I remembered the distinction.
Well, with those two things, it occurred to me that I really should share, because it seems to me that there are some knitters who struggle with YOs between knit and purl stitches.
So, onward!
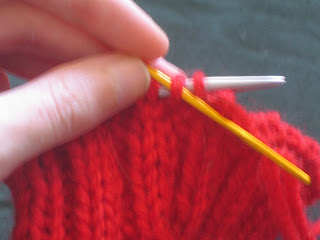
Here is a row where you want a YO between purl and knit.

My sneaky little trick to remember this is: when I was little, my mother taught me how to knit, but I learned YO as YF -- that is, an abbreviation for Yarn Forward -- which is, in a way, exactly the opposite of what you're doing. (That will make sense, I promise!)
In this case, the yarn's at the front of the work, since you just finished a purl stitch. You want to go all the way around the needle, and end with the yarn at the back of the work (since your next stitch is a knit stitch). So, my trick to remember is you're always wrapping the yarn over the needle from front to back (hence, the opposite of Yarn Forward towards you!)
In this case, the yarn's at the front of the work, since you just finished a purl stitch. You want to go all the way around the needle, and end with the yarn at the back of the work (since your next stitch is a knit stitch). So, my trick to remember is you're always wrapping the yarn over the needle from front to back (hence, the opposite of Yarn Forward towards you!)
So, you've got your yarn over the needle to the back, you then knit the stitch as per normal. If this weren't a knit stitch, you would have the yarn continue around the needle to the front.

And there you have it. It doesn't look like much now, but it'll show when it's knitted up on the next row.

Hope that helps! It's a trick that's saved me a lot of grief in my knitting, and like I said, I figured I should share. :)
Author's note: It took several tries to get the explanation I had in my head out onto the page in a way I thought worked. If you viewed this post early, it probably didn't make a lot of sense. Apparently, the heat is melting my brain . . .
Wednesday, 17 July 2013
Lost Stitches -- Or, how to Avert Panic Mode When you Realize you've Dropped a Stitch
So yep, it happens to all knitters.
I dropped a stitch this morning. Quite spectacularly, too, I might add. I couldn't figure out why my stitch-count on my Cable Sweater was one stitch short.
Lo and behold, I found the offending dropped stitch, seven rows down from where it should be. I'm just grateful that it was one of the increase stitches in the sleeve, so that it could only unravel so far. Once it hit the M1 increase(video link), it had nowhere else to unravel.
If it had been in a cable, this would have been a lot more complicated.
If it had been in a cable, this would have been a lot more complicated.
However.
The first thing you do when you've dropped a stitch is panic.
The second thing you do is secure the offending stitch where it is. I like to use safety pins. Especially if you have several dropped stitches, this becomes a necessity so that more stitches don't unravel.

The third thing you do, is you take a crochet hook, stick it in the offending stitch, and work (in this case, from the back, since it's a purl stitch) up the knitted work. If it were a vertical column of knit stitches you'd work from the front. You can't see it very well on this picture, but there will be laddered 'bars' of yarn where the stitch unraveled. You hook those with the crochet hook and pass the previous stitch over, until you get to the top of your knitting where you should be.

And the last thing is to rejoice that your knitting didn't need to be unraveled. I know this picture isn't the best, but it should give you an idea. The stitch that fell is the second last one on the left, which, as you can now (hopefully) see, is back on the needles without a problem.

Also, in the last picture, you can see that this left some residual tension weirdness (there's still some laddering, you can see my hand showing through). That happens sometimes. It should sort itself out as you continue to knit, and if it's a serious issue, blocking the finished piece can also help. In the absolute worst case-scenario, if you're not willing to frog back to fix the laddering, you can stitch it closed (carefully, or it'll show) with a tail end of yarn, but it's rare that you'll have to do that.
So, I hope that helps at least a few people.
And I promise I'll get better at photographs as soon as I figure out how have two hands on the knitting while holding the camera at the same time. :D Maybe I should invest in a camera stand or something. . .
Subscribe to:
Posts (Atom)